
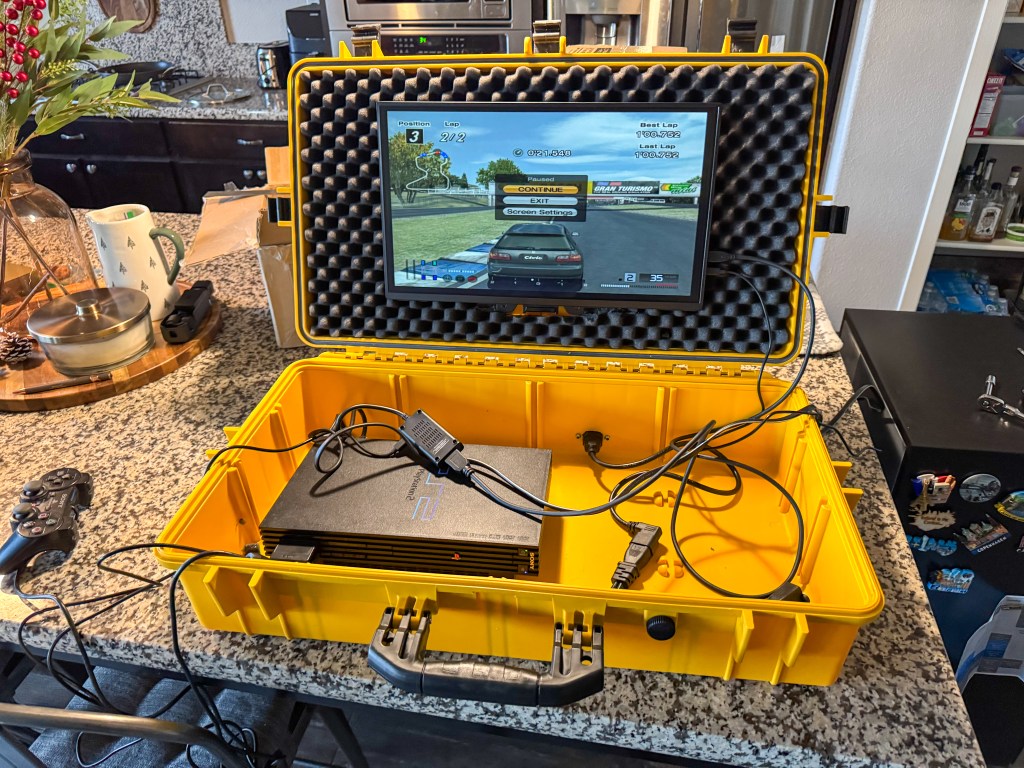
There are car projects, and then there are car projects. This one? It doesn’t require a jack or torque wrench, but it all starts with an idea, spirals into obsession, and tests your patience with a dozen trips back to the drawing board. I’m talking about my latest side quest project: building a fully portable PlayStation 2 gaming setup built for one purpose: To play Gran Turismo 4 anywhere in the world.
It might not sit on four wheels or have an engine that needs tuning, but the way this thing came together? It felt just like a project car. From failed concepts to last-minute fixes, the final moment when it just works. It’s project car culture through and through. See how I fared and how you can make your own.
The Idea
This whole thing started like any good project does: with a simple thought that refused to leave me alone. I wanted a way to play Gran Turismo 4 after recently acquiring a PS2 in a weak moment of nostalgia. Gran Turismo is more than just a game for me. It’s a time capsule of early-2000s car culture and the place that taught me about cars, modification, and racecraft. I wanted to be able to play whenever I wanted. Not just by tossing a PS2 in a duffel bag, though. No, I wanted something clean, rugged, and self-contained. Something I could throw in the trunk for a weekend trip or fire up on a folding table at a track day. Something that felt manufactured and not just thrown together. I decided to build a PS2 setup that met three specific requirements.
- #1 – It needed to be contained in a case. I only wanted one thing to carry around.
- #2 – Everything was already connected and installed. No setup or having to plug everything in every time I wanted to use it. Just turn it on and use it, period.
- #3 – It needed to have the ability to be taken anywhere. Durability and weight were important.
Version 1.0
The core of the build is a Pelican-style case I ordered on Amazon. I needed one large enough to contain everything while still being affordable. The fact that it came in yellow with black accents may have also swayed my decision. I also ordered a portable laptop monitor and a wall mount to place it inside the case (I will include a list of parts I used for the final version later). Version 1 was all about proof of concept to see if it would actually work. I drilled some holes and mounted the monitor up. With standard wiring including power and HDMI converters, along with some non-standard components like a power cable splitter and C15 conversion (more on that later), I got everything connected. I booted it up and it worked! The first start up cut right to my inner child core like hot nostalgia though butter. I was so excited, but it looked like crap, as it should.
The monitor was not very stable, and all of the cabling was incredibly thick. I was going to need to figure out how to manage all of the cables and have the monitor mounted in a better way. The important thing was that it did work, and I just needed to plan for how to make it look good and stay mounted. At this point, all of the hardware was just sitting in the case, and it needed to be mounted to not be destroyed when moving it. I needed to hit the drawing board and come up with some ideas.
Version 2.0
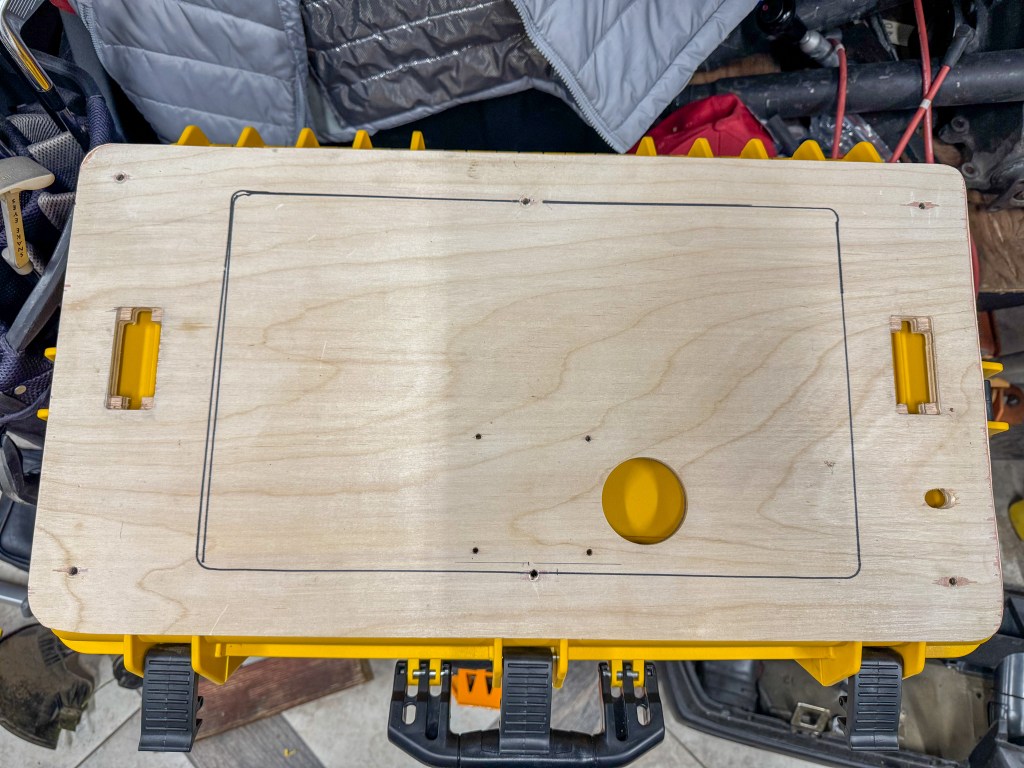
Just like wrenching on a car, iteration is part of the game. You try things, realize they suck, and try something else. I planned and planned, but never really got to where I wanted. Eventually, I landed on a setup that felt tight and functional after my neighbor Cassidy (a mechanical engineer) helped me. The key was to use plywood and mount them on standoffs. The standoffs would allow for space under the plywood for all of the cabling. The plywood itself would offer a better more stable place to mount things while also adding strength to the case as well. I wouldn’t have to worry about cutting foam, airflow to the Playstation fan, or the rat’s nest of wiring. With this plan in place I made my next round of orders and got started.
I measured 100 times and cut twice, just like the saying goes, right? I’m not very woodworking inclined, but as with anything in life, you gotta start somewhere. As I formed the panel for the back, I started to get better at measuring and cutting it to the perfect size. I decided the top panel would hold the monitor and the bottom panel would be cut up a bit to have some elevation to hold the taller wiring underneath it. In order to have a way to plug power in to the outside, I place a C13 to C14 adapter on the outside of the case. Unfortunately, these adapters were fairly tall so I’d require an elevated section to house them as I could raise the PS2 side any further. This would also give me ample room for the PS2 and still have room for the controllers. A big issue was giving the PS2 enough space to open the disc drive without hitting anything. The elevated section was high enough to accommodate the wires but low enough to fit under the disc drive. Once all of the wood was cut to spec, I measured out the heights one more time and made an order for some standoffs. I’d need multiple heights so measuring was crucial.


About a week later, I received the standoffs I needed, and they were perfect. I assembled all of the paneling as a final proof of concept of the new design before assembling for the last time (or so I thought). Everything lined up perfectly, but there was one thing missing I hadn’t considered. Sound. The monitor had some tiny speakers, and they worked fine when there was a big mount giving them space. However, mounting the monitor directly to the plywood covered up the speakers quite a bit, making them okay at best. It was back to the drawing board!
Version 3.1 vFinal
The monitor I purchased was left in the garage on a very cold night, and the screen started to separate from its case. I figured I had to take it apart anyway to get the glue back together, so my Cassidy and I did some exploratory surgery. We found that the speakers in the monitor were about the size of a nickel, which explained the volume. However, we also found that they had 5V going to them from an onboard amplifier which meant, technically, we could cut those wires and put in our own speakers as long as they were 5V compatible. I ordered up some 3×1 inch speakers that were about as deep as the plywood. The plan was to cut a slot in the plywood for them to sit and then cut another hole in the back of the monitor for the wires to run out of. After some further testing, the speakers worked and were significantly louder so we went forward and slotted out some space in the plywood for the speakers to sit.

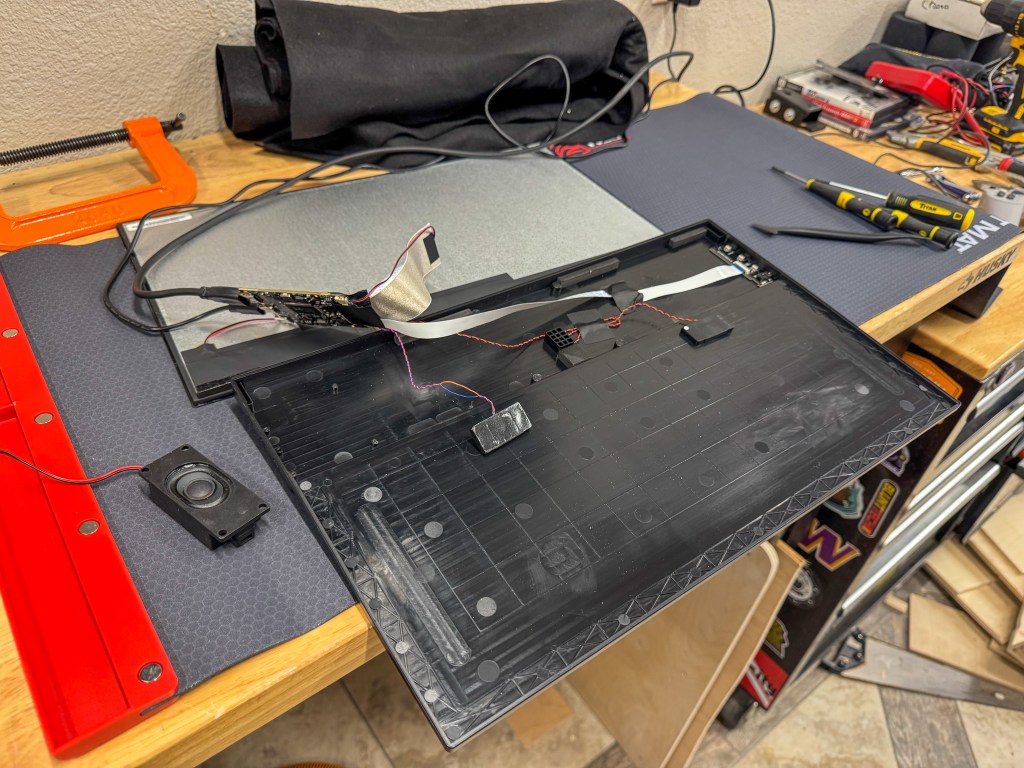
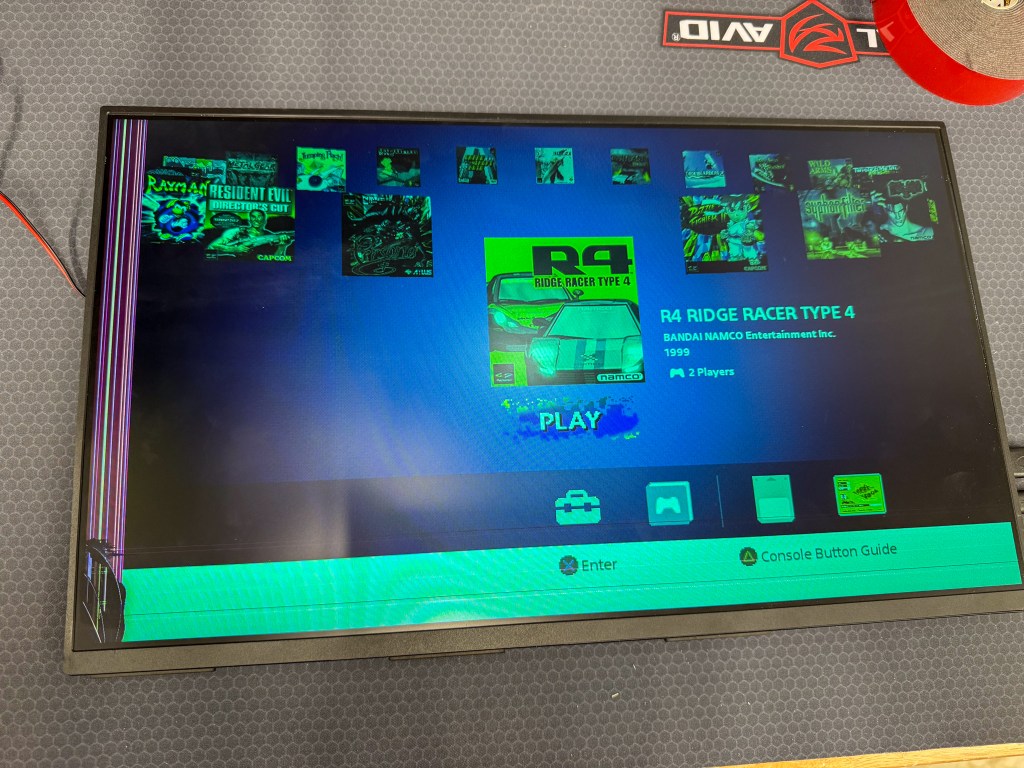
Everything was going perfect until I dropped the monitor…It was absolutely destroyed. Light bars and now green-tinted, this monitor was garbage. With our testing and plan working, all I needed was a new one and to start over in terms of wiring. I could have left this part out, but I think it’s important to highlight the negative parts as well. Sometimes you are on the finish line and your car breaks down. It’s part of life, and not everything goes exactly how you planned. You just need to pick yourself up and move forward not matter how much it sucks. You can always try again and Amazon will certainly almost always have another monitor in stock. Luckily for me they did.
I got the new monitor and got the wiring sorted out again. It was all together and installed. Before installing the plywood for the final time, I covered it all in black felt. Using Super 77 glue, the process wasn’t terrible but certainly wasn’t my favorite thing I’ve ever done. It looked significantly better without any plywood showing. It looked, dare I say, professional.

The next thing to do was mount the PS2. Wanting to continue the clean look, I cut out a plate of aluminum my neighbor had lying around. [Thank you again to Cassidy for basically designing this entire project and answering every question I had about it.] Anyway, we drilled some countersunk hole in the aluminum and mounted it to the felt side of the plywood. From there, I used some VHB I had lying around to mount the bottom of the PS2 to the aluminum panel. We cut the panel slightly smaller than the PS2 bottom so its barely visible. Last thing I needed to do was sort out a way to house the controllers. I got some Velcro strips with a loop at the end and screwed them down. The controllers sit on top and the Velcro wraps around them holding the controllers against the plywood. Not a very technical solution, but it works and continues the clean look.
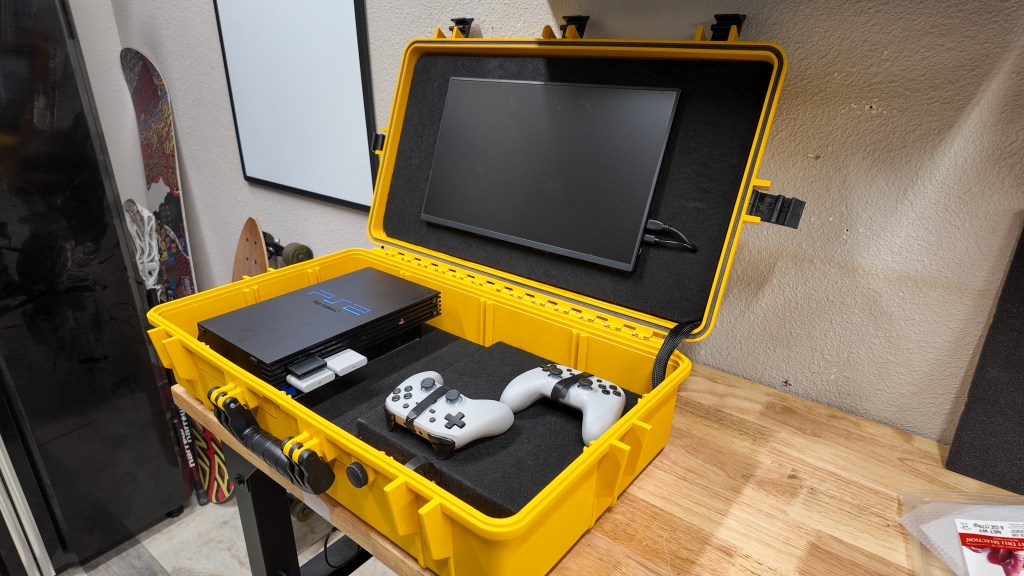

I finally assembled everything for the last time. It was amazing. It was everything I wanted it to be. Easy to use, clean and professional, but the best part was it was made by me. With my own hands. Yes, I had help but who doesn’t need help with new adventures. The feeling of tackling this project and it coming out better than expected was new to me. Considering my only real adventures into the unknown are with my unfinished project car, this was a new horizon for me to cross. I booted up the PlayStation and played GT4 in my garage for like 2 hours. Hard to see a better way to enjoy your garage. It’s one thing to build something cool. It’s another thing to make it useful.
Here is a full list of the parts needed to recreate the case in its final form. Your case may be different in sizing, so measure out what you need. This list is a general list for ideation.
The Soul of the Build
At first glance, this might seem like a side quest. A quirky side build that doesn’t really belong on The Late Brake started by a madman with too much time on his hands. But the more I worked on it, the more I realized how much it mirrors everything I love about car projects:
- You start with a vision
- You hit roadblocks
- You redesign, rebuild, and try again
- You learn from failure
- And eventually, you get to use the thing you built
That’s car culture in a nutshell. Whether it’s a drift car, a daily driver, or a hacked-together PS2 in a bright yellow case, the process is the same. Build something that reflects who you are. Learn something new. Enjoy the ride.
It’s not about perfection. It’s about progress.
Final Lap
Projects like this remind me why I love building stuff in the first place. They’re messy. They take forever. And half the time, you’re not even sure why you are doing it. But when they do come together? It’s magic. And that’s when it clicked: I hadn’t just built a gaming console. I’d built a tribute to car culture.
The portable PS2 isn’t just a fun toy. It’s a little slice of the garage that travels with me. A reminder that Gran Turismo was many of our first tastes of car knowledge, tuning, and motorsports. And that the spirit of building—of trying, failing, and trying again—applies to anything worth doing.
So yeah, maybe this isn’t the kind of project you usually see on The Late Brake. But it’s still 100% on brand. Because at the end of the day, this site isn’t just about cars. It’s about the culture, the creativity, and the people who keep chasing that next perfect lap.
Whether it’s in your garage or in a plastic case on your kitchen table.
And that next perfect lap? It starts at Trial Mountain, in a JDM legend tuned to the moon, on a screen that folds neatly into a waterproof box.


Leave a Reply